Natural Easter Egg Colors to Dye For
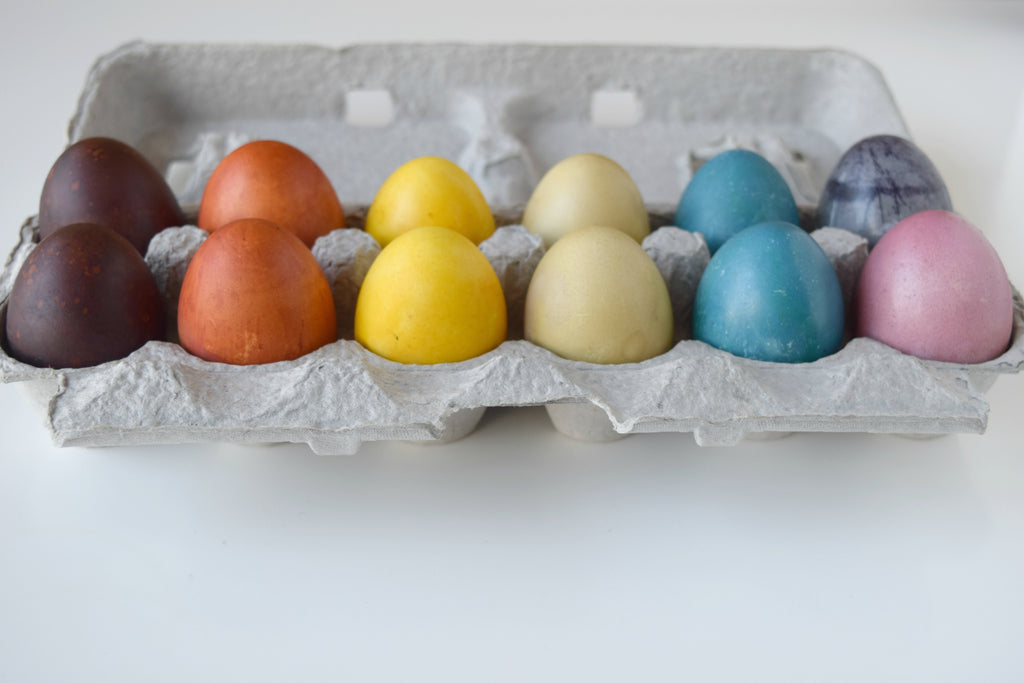
This is a fun, family-friendly project that requires you to be equal parts cook and chemist. I tested a total of 14 ingredients, and the selections below are my picks for generating the most vibrant colors. The process can be lengthy (I let my eggs soak overnight), so be sure to allocate at least a few hours to create your masterpieces before you plan on using them. Each batch makes about 2 cups of dye. If you need more, you can increase the amount by following the ratios given below.

MATERIALS:
- White eggs and carton
- Reusable coffee filter
- Wide-mouth mason jars (one for each dye)
- White vinegar
- Slotted spoon
- Vegatable oil (optional)

DYE INGREDIENTS:
- Blue: 1 1/2 cups chopped red cabbage
- Dark brown/maroon: 1 1/2 cups red onion skins (inquire about purchasing from the bottom of your grocer's bin)
- Light green: 1 1/2 cups chopped artichoke
- Orange: 1 1/2 cups yellow onion skins (inquire about purchasing from the bottom of your grocer's bin)
- Pink: 1 cup chopped beets
- Purple: 1 1/2 cups frozen blueberries
- Yellow: 1 1/2 tablespoons turmeric

DIRECTIONS:
1. Start with boiled eggs. To learn how to make perfect hard-boiled eggs, clickhere. Set eggs aside and let cool while you make the dyes.
2. To make each batch, pour the dye matter into a medium sauce pot and add 1 1/2 cups of water or enough to cover your ingredients by about an inch.
3. Bring the mixture to a boil, cover and then let simmer on low for 30 minutes.
4. Add 1 tablespoon of vinegar to the mixture and stir.
5. Strain the mixture through the coffee filter into the mason jar. Fill the jar only up to an inch below the brim.
6. Once the dye reaches room temperature, lower up to two eggs into the mixture, making sure that they are fully submerged. Add more dye if needed.
7. Refrigerate eggs in the covered mason jar until the desired color is reached. Plan for at least two hours, although overnight is recommended.
8. Carefully remove the eggs with the slotted spoon and let dry, preferably in an egg carton.
9. Optional: to give the dried eggs a nice sheen, use a paper towel to gently polish them with a small amount of vegetable oil.
10. Refrigerate dyed eggs until ready to use.
*This article was first published on the MarthaStewart.com Network on March 10, 2015.
 Hey Haute Mamas! I'm Riche Holmes Grant, a modern mom + mompreneur who designs smart + stylish products that make your mommy gig easier.
When I'm not busy taking orders from my #miniboss, I'm contributing to MarthaStewart.com or in the kitchen whipping up delicious family-friendly creations in my BambiniWare Apronini.
Get my FREE book on How to Make the Best Food for Your Baby here!
I live in the Washington, DC area with my husband and daughter. Follow our adventures on Instagram via @BambiniWareLife!
- Categories: DIY + Crafts Easter Family Fun
- Riche Holmes Grant


Comments 0